Connecting the Dots: Understanding How Pods Talk in Kubernetes Networks
Content
Kubernetes DNS Expedition🔥
📚 Introduction
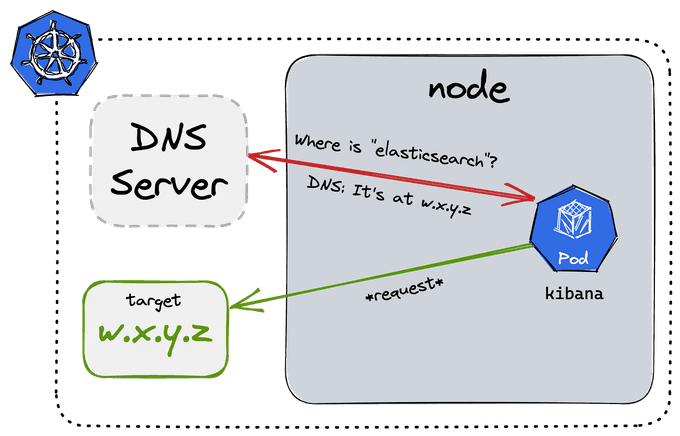
Kubernetes is an orchestration system for managing containerized applications. One of its key features is DNS, which allows pods to communicate with each other using DNS names instead of IP addresses.
In this blog post, we will walk through the life of a DNS query in Kubernetes, from when a pod performs a lookup to when it receives the IP address of the requested hostname. We will also discuss how DNS plays a role in service discovery, which is the process of routing incoming requests to the correct workloads running in the cluster.
By understanding how DNS works in Kubernetes, you will be better equipped to debug issues and troubleshoot problems with your applications.
Pods communication in Kubernetes
Using IP addresses to communicate between pods presents two key challenges:
- Dynamic IP assignment: Pods can be assigned new IP addresses during creation, scaling, or restarts. Tracking these changing addresses and updating configurations becomes complex and error-prone.
- External accessibility limitation: Pods' IP addresses are not reachable outside the Kubernetes cluster due to non-routability. To access pods externally, a service is required.
Services address these issues by establishing a consistent name for a pod group:
Stable Communication:Pods can refer to the service name instead of dynamic IP addresses when connecting to other pods. The service efficiently routes traffic to the intended pod.
Beyond IP-related challenges, services offer several advantages:
- Load balancing: Traffic distribution across pods enhances application performance by maintaining balanced workloads.
- High availability: Service configuration ensures traffic redirection to functioning pods if one fails, ensuring uninterrupted application availability.
- DNS resolution: Services can be registered with Kubernetes DNS, enabling easy pod-to-pod connectivity without needing to know individual pod IP addresses.
🗝 Kubernetes DNS and Service discovery
In Kubernetes, service discovery relies on the essential component of DNS (Domain Name System). Service resources facilitate service discovery by associating an IP address with a healthy pod, enabling seamless connections.
Upon creating a service, the Kubernetes cluster's DNS server generates an A record, mapping the service's DNS name to its IP address.
Consequently, pods can conveniently access the service using its DNS name. The DNS server dynamically updates the A record to reflect changes in the service's IP address, ensuring accuracy.
The Domain Name System (DNS) is a mechanism that connects user-friendly names, like domain names, to corresponding IP addresses. This translation simplifies end-users' access to target domains. Kubernetes clusters incorporate an internal DNS service by default, ensuring efficient service discovery even as pods and services are created, shifted, or removed across nodes.
Recent Kubernetes versions transitioned from kube-dns to CoreDNS to address security and stability concerns, with CoreDNS introduced in version 1.11.
Both implementations function similarly:
-
A
kube-dnsservice and one or more pods are created. -
The
kube-dnsservice monitors the Kubernetes API for service and endpoint events and changes its DNS entries as appropriate. When you modify these Kubernetes services and their related pods with creating, editing, or deleting operations, these events are auto-triggered. -
Kubeletassigns thecluster IPof the kube-dns service to every new podetc/resolv.confnameserver option, along with suitable search settings to allow for shorter hostnames:nameserver 10.32.0.10 search namespace.svc.cluster.local svc.cluster.local cluster.local options ndots:5
Containerized applications may then resolve hostnames like example-service.namespace to the appropriate cluster IP address.

Overview of the Kubernetes DNS Records
Let's understand Kubernetes DNS records better with the help of an example.
The entire DNS A record for a Kubernetes service will look like:
service.namespace.svc.cluster.localA pod would have a record in this format, which would represent the pod's real IP address:
10-32-0-125.namespace.pod.cluster.localBesides, SRV records are created for the specified ports of a Kubernetes service:
_port-name._protocol.service.namespace.svc.cluster.localAs a result, your application or microservice may hit a simple and consistent hostname to reach other services or pods on the cluster, thanks to the built-in DNS-based service discovery mechanism.
Resolving shorter hostnames and searching domains
You won't always need to utiuselize the whole hostname to access another service because of the search domain suffixes set in the resolv.conf file.
If you're contacting a service in the same namespace, you may just call it by its name:
other-serviceAdd other-namespace to the query if the service is in a different namespace:
other-service.other-namespaceYou'll need to use at least the following if you're going after a pod:
pod-ip.other-namespace.podOnly the .svc suffixes are automatically completed in the default resolv.conf file.
Therefore, it is essential to specify the settings up to .pod.
An example service definition looks like this:
apiVersion: v1
kind: Service
metadata:
  name: foo
  namespace: bar
spec:
  ports:
    - port: 80
      name: http
The A record and SRV record (discussed later in the article) that are created in this instance look like this:
foo.bar.svc.cluster.local                  30   A   10.129.1.26
_http._tcp.nginx.default.svc.cluster.local 3600 SRV 0 100 80 10-129-1-26.foo.bar.svc.cluster.local.
To create the fully qualified domain name FQDN for this service, we use the name of the service (foo), the namespace (bar), and the cluster domain (cluster.local).
Any workload running in the cluster can now resolve the service's IP address using this DNS name.
DNS lookups on services

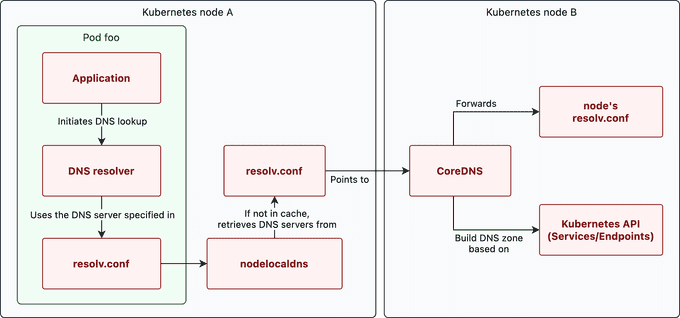
When a pod performs a DNS lookup, the query is first sent to the local DNS resolver in the pod. This resolver uses the resolv.conf configuration file. In this file, the nodelocaldns server is set up as the default recursive DNS resolver, which acts as a cache.
If this cache does not contain the IP address for the requested hostname, the query is forwarded to the cluster DNS server (CoreDNS).
This DNS server determines the IP address by consulting the Kubernetes service registry. This registry contains a mapping of service names to their corresponding IP addresses. This allows the cluster DNS server to return the correct IP address to the requesting pod.
Any domains that are queried but are not in the Kubernetes service registry are forwarded to an upstream DNS server.
We will go through each of these components in more detail step by step.
Pod foo
When a pod sends an API request to a service within the same Kubernetes cluster, it must first resolve the IP address of the service. To do this, the pod performs a DNS lookup using the DNS server specified in its /etc/resolv.conf configuration file.
This file, which is provisioned by the Kubelet, defines the settings for DNS lookups in the pod. It contains a reference to the cluster DNS server.
By default, this configuration file looks something like this:
search namespace.svc.cluster.local svc.cluster.local cluster.local
nameserver 10.123.0.10
options ndots:5
Pod config
By default, the /etc/resolv.conf file provided by the Kubelet will forward all DNS queries to the cluster's DNS server (10.123.0.10 in the example above). The Kubelet also defines search domains and the ndots option for DNS queries.
The search domains specify which domain suffixes should be searched when incomplete domains (non-FQDNs) are given. The ndots option determines when a query for the absolute domain is made directly instead of first appending the search domains.
To better understand how this works, let's look at an example. Suppose a pod named foo performs a DNS lookup for bar.other-ns. If the ndots option is set to 5 (the default value), the resolver will count the number of dots in the domain.
If there are fewer than 5 dots, the search domains will be appended before the DNS lookup is performed on the DNS server. If there are 5 or more dots, the domain will be queried as-is without appending the search domains.
In this example, bar.other-ns has less than 5 dots, so the search domains will be appended before the DNS lookup is performed.
By default, the search domains are:
- <requester_namespace>.svc.cluster.local
- svc.cluster.local
- cluster.local
Until a valid response is found, these search domains are appended to the domain and queried.
The resolver will try the following queries one by one:
- bar.other-ns.<requester_namespace>.svc.cluster.local
- bar.other-ns.svc.cluster.local (⇐ match found!)
The bar service will be listening on bar.other-ns.svc.cluster.local, so a match is found and the proper A-record is returned.
To change the behavior of a pod's DNS resolver, you can change the DNS config of a pod:
apiVersion: v1
kind: Pod
metadata:
  namespace: default
  name: dns-example
spec:
  containers:
    - name: test
      image: nginx
  dnsPolicy: "None"
  dnsConfig:
    nameservers:
      - 1.2.3.4
    searches:
      - ns1.svc.cluster-domain.example
      - my.dns.search.suffix
    options:
      - name: ndots
        value: "2"
      - name: edns0
In the example above, the dnsPolicy is set to "None", which means that the pod will not use the default DNS settings provided by the cluster.
→ Instead, the dnsConfig field is used to specify custom DNS settings for the pod.
The nameservers field is used to specify the DNS servers that the pod should use for DNS lookups.
The searches field is used to specify the search domains that should be used for incomplete domains.
The options field is used to specify custom options for the DNS resolver, such as the ndots and edns0 options in the example above.
These settings will be used by the pod's DNS resolver instead of the default settings provided by the cluster. For more information on pod DNS configuration, see the official docs.
🛠️ Authoritative DNS server
In Kubernetes clusters up to version 1.13, kube-dns acted as the authoritative DNS server for Kubernetes. In Kubernetes version 1.13, CoreDNS replaced kube-dns as the default component for authoritative DNS queries.
The DNS server adds all services to its authoritative DNS zone, so that it can resolve domain names to IP addresses for Kubernetes services. Various software implementations exist for the authoritative DNS server in Kubernetes.
CoreDNS is a popular choice, as it supports building a DNS zone from the Kubernetes service registry.
It also offers extra features such as caching, forwarding, and logging.
An example of a configuration file of CoreDNS:
.:53 {
    errors
    health {
        lameduck 5s
    }
    ready
    kubernetes cluster.local in-addr.arpa ip6.arpa {
        fallthrough in-addr.arpa ip6.arpa
        ttl 30
    }
    forward . /etc/resolv.conf
    cache 30
}
Important to note are the kubernetes zone and the forward statement.
Nodelocaldns
DNS queries are a common and essential part of network communication. They need to be processed quickly to avoid performance issues. Slow DNS queries can cause problems that are difficult to diagnose and troubleshoot.
To improve the performance of DNS queries in a Kubernetes cluster, a cache layer can be added on each node using the nodelocaldns component. This component caches the responses to DNS queries.
If no response is found in the cache, it forwards the query to the authoritative nameserver (CoreDNS). The response is stored in the local cache so that it can be used to serve future queries from the same or other pods on the same node.
This reduces the amount of network traffic between pods and the DNS server. This means lower latencies and faster DNS query performance. The function of nodelocaldns is often fulfilled by CoreDNS as well.
A note on the TTL (time-to-live) of records in Kubernetes
In Kubernetes, the time-to-live (TTL) of DNS records is determined by the DNS server implementation that is being used.
By default, CoreDNS sets the TTL of DNS records to 30 seconds. This means that when a DNS query is resolved, the response will be cached for up to 30 seconds before it is considered stale. The TTL of DNS records can be modified using the ttl option in the CoreDNS configuration file.
The TTL of DNS records is an important parameter because it determines how long a DNS response will be considered valid before a new query must be made.
A shorter TTL can improve the accuracy of DNS responses, but it can also increase the load on the DNS server. A longer TTL can reduce the load on the DNS server. However, it can also cause DNS responses to be outdated or inaccurate if the underlying DNS records are updated.
Therefore, the appropriate TTL should be chosen based on the specific requirements of the cluster.
Bonus: SRV records
So far we've only talked about resolving IP addresses using A-records. Kubernetes also uses SRV (service) records to resolve the port numbers of named services. This allows clients to discover the port numbers of services by querying the DNS server for the appropriate SRV record.
apiVersion: v1
kind: Service
metadata:
  name: nginx
  namespace: default
spec:
  ports:
    - port: 80
      name: http
In this service, the container port 80 is exposed and is given the name "http". Because the port is named, Kubernetes will generate an SRV record with the following name: _<port>._<proto>.<service>.<ns>.svc.<zone>.
In this case, the SRV record will be named _http._tcp.nginx.default.svc.cluster.local. A DNS query for this record would return the port number and IP address of the named service:
dig +short SRV _http._tcp.nginx.default.svc.cluster.local
0 100 80 10-129-1-26.nginx.default.svc.cluster.local.
Some services, such as Kerberos, use SRV records for the discovery of the KDC (Key Distribution Center) servers.
Putting it all together
Whenever you create a pod, it gets assigned an IP. Any two pods in your cluster can talk to each other using their IP addresses. The problem with using IP addresses for pods to talk to each other is that these IPs may change as pods get deleted and recreated. For pods to consistently address each other correctly, you can use a Service. When you create a service using kubectl, the Kubernetes apiserver will save its data, and another pod called kubernetes-controller-manager will wake up and break that service down into two resources: Endpoints and EndpointSlices. CoreDNS will use those resources to know how to turn a service name into a service IP. Additionally, each node's kube-proxy pods will update the node's iptables rules. Those iptables rules cause requests to the service's IP to get addressed to the service's pods. Finally, when a pod makes a request, it will do a DNS query to CoreDNS to get the service's IP. Then, when sending packets to that IP, the iptables rules created by kube-proxy will cause the packets to get addressed to an actual pod's IP.
💡 A few more notes
There are some missing more points, that I did not cover.
Among those details is how a pod gets assigned an IP and how iptables rules work. I also haven't touched on CNI plugin implementations, like Kindnet.
A tour through container networking itself would also be helpful for most readers.
Finally, if you want to learn more about CoreDNS itself, this talk is a great start.
Conclusion
In this blog post, we explored how pods in Kubernetes networks talk to each other. We learned about the different components involved in Kubernetes DNS, and how they work together to resolve DNS queries. We also explored some of the challenges of Kubernetes DNS, and how to overcome them.
We hope that you have found this blog post helpful. If you have any other tips or tricks that you would like to share, please leave a comment below.
Until next time, つづく 🎉
💡 Thank you for Reading !! 🙌🏻😁📃, see you in the next blog.🤘 Until next time 🎉
🚀 Thank you for sticking up till the end. If you have any questions/feedback regarding this blog feel free to connect with me:
♻️ LinkedIn: https://www.linkedin.com/in/rajhi-saif/
♻️ X/Twitter: https://x.com/rajhisaifeddine
The end ✌🏻
🔰 Keep Learning !! Keep Sharing !! 🔰
📅 Stay updated
Subscribe to our newsletter for more insights on AWS cloud computing and containers.
