From Docker images into Dockerfile: Docker the other way around
Content
Backtracking Docker images ⏪
📕 Introduction
Have you ever come across a Docker image that you wanted to use, but you couldn't modify it to fit your specific needs? Or maybe you found a Docker image that you liked, but you wanted to understand how it was built? In both cases, reverse engineering Docker images into Dockerfiles can be a useful tool.
Transforming Docker images into Dockerfiles means taking an existing Docker image and using it to create a Dockerfile that you can modify and control. This process allows you to understand the inner workings of a Docker image, make modifications, update images to run on different platforms, or optimize them for specific requirements.
In this blog post, we'll walk you through the process of deciphering Docker images into Dockerfiles using some open-source tools.
🐍 Dedockify: Reverse Engineering Docker Images with Python
Docker images are like black boxes, containing layers of instructions that were executed during the image build process.
Here comes Dedockify, a Python script that can help rebuild an approximation of the Dockerfile used to create an image.
Dedockify works by using the metadata stored alongside each image layer. It walks backward through the layer tree, collecting the commands associated with each layer. This process allows it to reconstruct the sequence of commands that were executed during the image build process.
However, there's a catch: the output generated by Dedockify won't match the original Dockerfile exactly if the COPY or ADD directives were used. This is because Dedockify doesn't have access to the build context that was present when the original docker build command was executed.
To use Dedockify, you can run it as a Docker container:
docker run -v /var/run/docker.sock:/var/run/docker.sock dedockify <imageID>The <imageID> parameter is the image ID (either the truncated form or the complete image ID).
The script interacts with the Docker API to query the metadata for the various image layers, so it needs access to the Docker API socket. The -v flag shown above makes the Docker socket available inside the container running the script.
🔍 How Does It Work?
When an image is constructed from a Dockerfile, each instruction in the Dockerfile results in a new layer. You can see all of the image layers by using the docker images command with the (now deprecated) --tree flag.
$ docker images --tree
Warning: '--tree' is deprecated, it will be removed soon. See usage.
└─511136ea3c5a Virtual Size: 0 B Tags: scratch:latest
    └─1e8abad02296 Virtual Size: 121.8 MB
        └─f106b5d7508a Virtual Size: 121.8 MB
            └─0ae4b97648db Virtual Size: 690.2 MB
                └─a2df34bb17f4 Virtual Size: 808.3 MB Tags: buildpack-deps:latest
                    └─86258af941f7 Virtual Size: 808.6 MB
                        └─1dc22fbdefef Virtual Size: 846.7 MB
                            └─00227c86ea87 Virtual Size: 863.7 MB
                                └─564e6df9f1e2 Virtual Size: 1.009 GB
                                    └─55a2d383d743 Virtual Size: 1.009 GB
                                        └─367e535883e4 Virtual Size: 1.154 GB
                                            └─a47bb557ed2a Virtual Size: 1.154 GB
                                                └─0d4496202bc0 Virtual Size: 1.157 GB
                                                    └─5db44b586412 Virtual Size: 1.446 GB
                                                        └─bef6f00c8d6d Virtual Size: 1.451 GB
                                                            └─5f9bee597a47 Virtual Size: 1.451 GB
                                                                └─bb98b84e0658 Virtual Size: 1.452 GB
                                                                    └─6556c531b6c1 Virtual Size: 1.552 GB
                                                                        └─569e14fd7575 Virtual Size: 1.552 GB
                                                                            └─fc3a205ba3de Virtual Size: 1.555 GB
                                                                                └─5fd3b530d269 Virtual Size: 1.555 GB
                                                                                    └─6bdb3289ca8b Virtual Size: 1.555 GB
                                                                                        └─011aa33ba92b Virtual Size: 1.555 GB Tags: ruby:2, ruby:2.1, ruby:2.1.1, ruby:latest
Each one of these layers is the result of executing an instruction in a Dockerfile. In fact, if you do a docker inspect on any one of these layers you can see the instruction that was used to generate that layer.
$ docker inspect 011aa33ba92b
[{
    ...
    "ContainerConfig": {
        "Cmd": [
                "/bin/sh",
                "-c",
                "#(nop) ONBUILD RUN [ ! -e Gemfile ] || bundle install --system"
        ],
        ...
}]
🛠️ Docker Example
Here's an example that shows an official Docker ruby image being pulled and the Dockerfile for that image being generated.
$ docker pull mrhavens/dedockify
Using default tag: latest
latest: Pulling from dedockify
$ alias dedockify="docker run -v /var/run/docker.sock:/var/run/docker.sock --rm mrhavens/dedockify"

$ dedockify <imageID>
FROM buildpack-deps:latest
RUN useradd -g users user
RUN apt-get update && apt-get install -y bison procps
RUN apt-get update && apt-get install -y ruby
ADD dir:03090a5fdc5feb8b4f1d6a69214c37b5f6d653f5185cddb6bf7fd71e6ded561c in /usr/src/ruby
WORKDIR /usr/src/ruby
RUN chown -R user:users .
USER user
RUN autoconf && ./configure --disable-install-doc
RUN make -j"$(nproc)"
RUN make check
USER root
RUN apt-get purge -y ruby
RUN make install
RUN echo 'gem: --no-rdoc --no-ri' >> /.gemrc
RUN gem install bundler
ONBUILD ADD . /usr/src/app
ONBUILD WORKDIR /usr/src/app
ONBUILD RUN [ ! -e Gemfile ] || bundle install --system
🏊 Dive
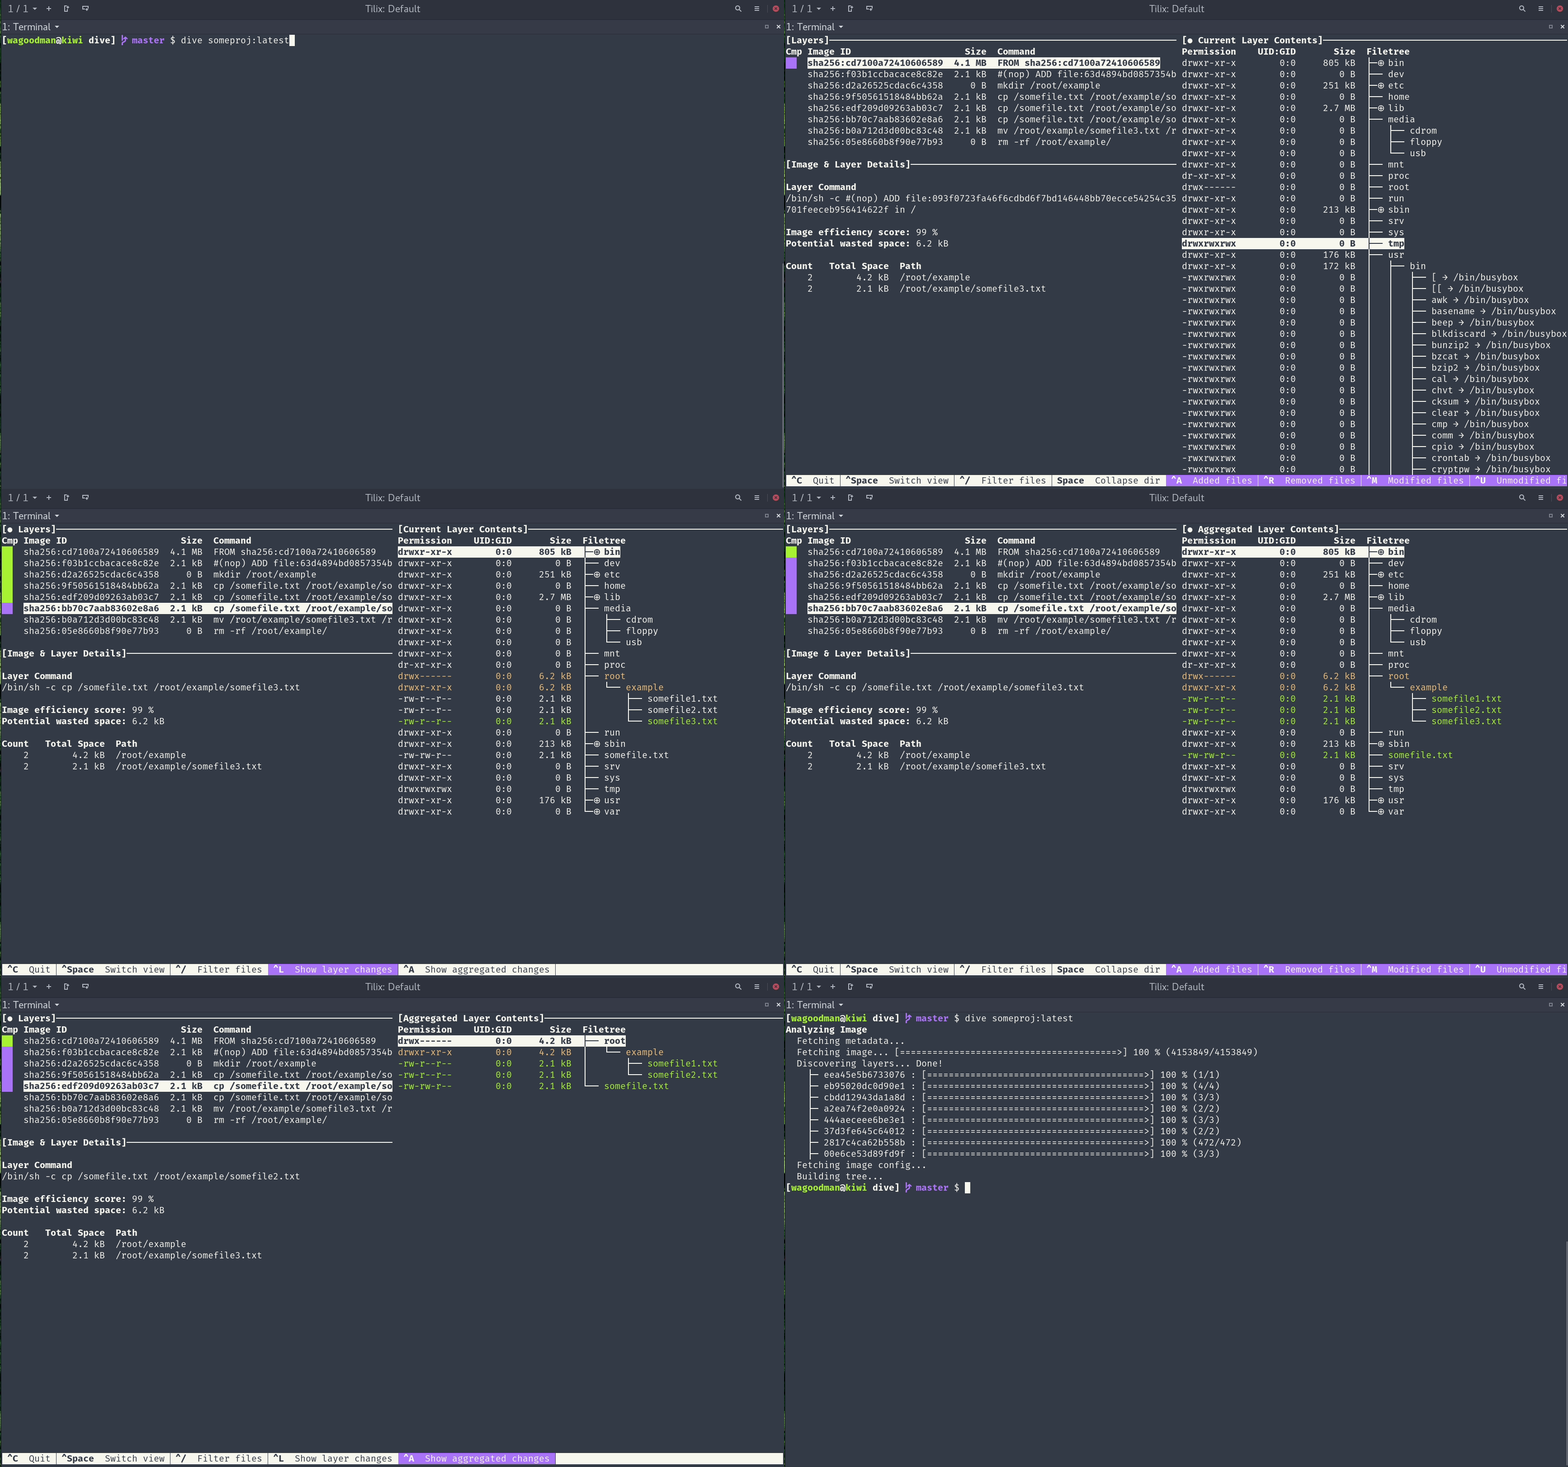
Dive is a tool for exploring a Docker image, layer contents, and discovering ways to shrink the size of your Docker/OCI image. It provides a detailed breakdown of the contents of each layer, including file sizes, permissions, and more. It is particularly useful for identifying unnecessary files or dependencies that can be removed to reduce the size of your images.

✨ Features
- Detailed Layer Breakdown: Dive provides a detailed breakdown of each layer in your Docker or OCI image. It displays the size of each file, its permissions, and other metadata.
- Color-Coded Interface: Dive uses a color-coded interface to highlight different types of files. This makes it easy to identify and remove unnecessary files or dependencies.
- Interactive Exploration: Dive allows you to explore the contents of each layer interactively. You can navigate through the layers, view individual files, and make changes to optimize your image.
- Optimization Suggestions: Dive provides suggestions for optimizing your image. It identifies large files, unnecessary dependencies, and other potential optimizations.
🚀 Usage
To use Dive, you need to install it on your system and run it against a Docker or OCI image:
dive <imageID>For example, to analyze the official Alpine Linux image, you would run:
dive alpine:latestDive will then display a detailed breakdown of the image layers, allowing you to explore the contents of each layer and identify potential optimizations.
🕵️ docker history
Aside from third-party tools like Dive, the tool we have immediately available is docker history. If we use the docker history command on our example image, we can view the entries we used in the Dockerfile to create that image.
docker history nginxWe should, therefore, get the following result:
IMAGE               CREATED             CREATED BY                                      SIZE                COMMENT
374e0127c1bc        25 minutes ago      /bin/sh -c #(nop) COPY file:aa717ff85b39d3ed…   0B
84acff3a5554        25 minutes ago      /bin/sh -c #(nop) COPY file:2a949ad55eee33f6…   0B
a9cc49948e40        25 minutes ago      /bin/sh -c #(nop) COPY file:e3c862873fa89cbf…   0B
Notice that everything in the CREATED BY column is truncated. These are Dockerfile directives passed through Bourne shell. This information could be useful for recreating our Dockerfile, and although it is truncated here, we can view all of it by also using the --no-trunc option:
docker history example1 --no-truncIMAGE CREATED CREATED BY SIZE COMMENT
sha256:374e0127c1bc51bca9330c01a9956be163850162f3c9f3be0340bb142bc57d81 29 minutes ago /bin/sh -c #(nop) COPY file:aa717ff85b39d3ed034eed42bc1186230cfca081010d9dde956468decdf8bf20 in / 0B
sha256:84acff3a5554aea9a3a98549286347dd466d46db6aa7c2e13bb77f0012490cef 29 minutes ago /bin/sh -c #(nop) COPY file:2a949ad55eee33f6191c82c4554fe83e069d84e9d9d8802f5584c34e79e5622c in / 0B
sha256:a9cc49948e40d15166b06dab42ea0e388f9905dfdddee7092f9f291d481467fc 29 minutes ago /bin/sh -c #(nop) COPY file:e3c862873fa89cbf2870e2afb7f411d5367d37a4aea01f2620f7314d3370edcc in / 0BWhile this has some useful data, it could be a challenge to parse from the command line. We could also use docker inspect.
🛠️ Dockerfile From Image (dfimage)
Similar to how the docker history command works, the Python script can re-create the Dockerfile (approximately) that was used to generate an image using the metadata that Docker stores alongside each image layer.
Link: dfimage
The Python script is itself packaged as a Docker image so it can easily be executed with the docker run command:
docker run -v /var/run/docker.sock:/var/run/docker.sock dfimage ruby:latestThe ruby:latest parameter is the image name & tag (either the truncated form or the complete image name & tag).
Since the script interacts with the Docker API in order to query the metadata for the various image layers, it needs access to the Docker API socket. The -v flag shown above makes the Docker socket available inside the container running the script.
Note that the script only works against images that exist in your local image repository (the stuff you see when you type docker images). If you want to generate a Dockerfile for an image that doesn't exist in your local repo, you'll first need to docker pull it.
📜 Summary
Reverse engineering Docker images into Dockerfiles, or "backtracking Docker images," is a useful technique for understanding and recreating the build process of an image. Tools like Dive and Dedockify can help by analyzing image layers and metadata to generate a corresponding Dockerfile.
Until next time, つづく 🎉 🇵🇸
💡 Thank you for Reading !! 🙌🏻😁📃, see you in the next blog.🤘 Until next time 🎉
🚀 Thank you for sticking up till the end. If you have any questions/feedback regarding this blog feel free to connect with me:
♻️ LinkedIn: https://www.linkedin.com/in/rajhi-saif/
♻️ X/Twitter: https://x.com/rajhisaifeddine
The end ✌🏻
🔰 Keep Learning !! Keep Sharing !! 🔰
📅 Stay updated
Subscribe to our newsletter for more insights on AWS cloud computing and containers.
